WiFi Keeps Disconnecting on Windows 10? Here’s the Fix
Method 1: Set your Home Network as Private instead of Public
Poor WIFI settings are often the culprit for frequent issues with connection to the internet. Some users report that having your Home Network public may cause issues with the connection. This can be fixed easily by simply setting your WiFi networks to private.
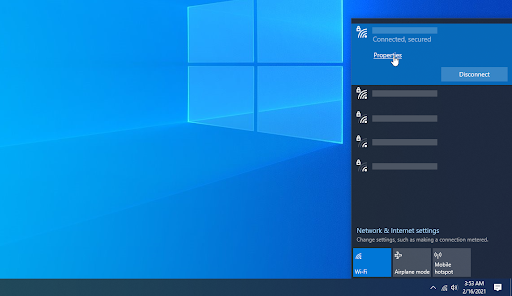
Click on the Network & Internet icon in the system tray. If you don't see this icon in your system tray, try clicking on the arrow pointing upwards to reveal any hidden items.
- Click on the network you’re connected to, then click on the Properties link.
- Look for the Network profile heading. In this section, make sure to change the connection to Private instead of Public. Make sure to only use this if you're connected to WiFi networks you trust.

- Test if your internet still keeps disconnecting after making the change.
Method 2: Disable WiFi Sense
WiFi Sense can be quite a problematic feature despite what it was made for originally. We recommend trying to disable the feature in order to test if it causes any interference with your network.
2021 Update: Wifi Sense no longer exists after Windows 10's version 1803 update. The feature has been quietly removed from all computers due to reasons Microsoft specified in the Announcing Windows 10 Insider Preview Build 14342 blog post.
If you're still using an older version of Windows 10 with WiFi Sense enabled, follow the steps below to turn the feature off and potentially fix your internet connections:
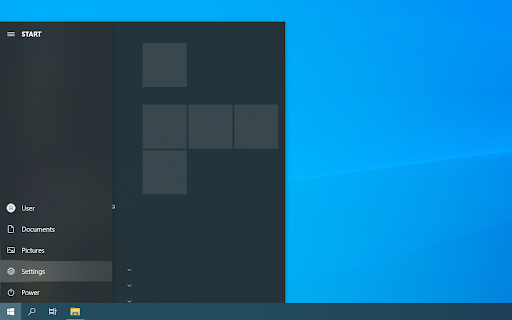
- Click on the Windows icon in your taskbar to bring up the Start menu. Here, click on Settings. (You can also use the Windows + I keyboard shortcut.)
- Click on the Network & Internet tile.

- Use the menu on the left-hand side to switch to the Wi-Fi section. Click on the "Manage Wi-Fi settings" link under the details of your current connection, as shown below.

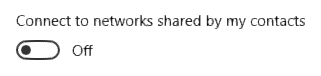
- Scroll down until you reach the Wi-Fi Sense section. Toggle the switch under Connect to networks shared by my contacts to Off in order to make sure that the feature is properly disabled.

- Test if your internet still has connection issues. You may be required to restart your computer before the changes take place.
- Test if your WiFi still has connection issues.
Method 3: Fix your Power Management settings
It’s possible that your Power Management settings disable your wireless adapter from time to time, causing it to temporarily disconnect. You can easily fix this by making one small adjustment.
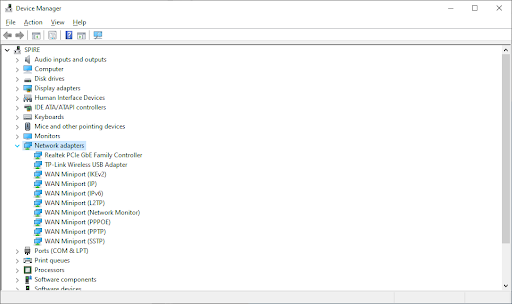
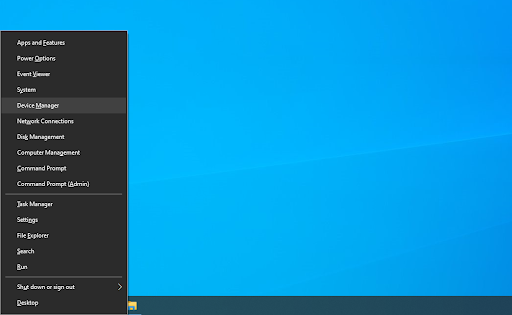
- Press the Windows + X keys on your keyboard and click on the Device Manager option from the menu.

- Expand the Network Adapters menu by clicking on the arrow next to it.
- Double-click on your adapter, then switch over to the Power Management tab in the new window. Uncheck the box next to Allow the computer to turn off this device to save power then click OK.

- Uncheck the box next to “Allow the computer to turn off this device to save power” then click OK.
- Restart your device and see if you still experience WiFi issues.
Method 4: Run the Network Troubleshooter
Windows 10 comes with plenty of troubleshooters to get rid of common issues and bugs without having to contact customer support. The Network Troubleshooter may be able to identify and automatically fix issues with your WiFi.
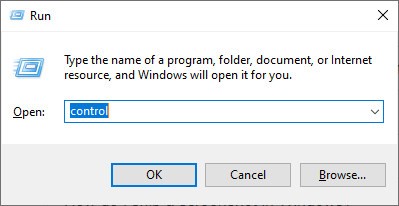
- Search "run" or press the Windows + R keys on your keyboard to bring up the Run utility. Type in "control" and click the OK button. This is going to open the Control Panel.
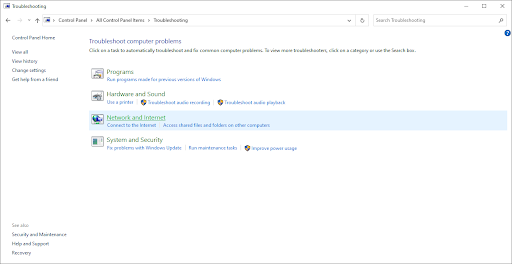
- Once the Control Panel is open, make sure to set your View mode to Large icons. Now, choose the Troubleshooting option.

- Click on Network and Internet.
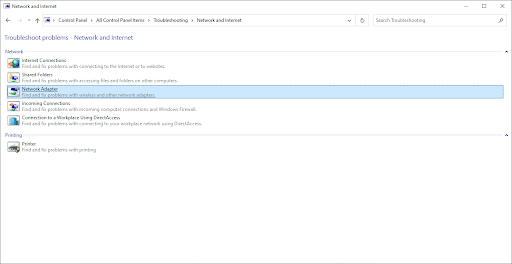
- On the next screen, choose Network Adapter, then follow the on-screen instructions to automatically repair any detected errors.
- Restart your device and see if you still experience WiFi issues.
Method 5: Reset the Wi-Fi AutoConfig service
It’s possible that a disabled service is making your WiFi behave in an unexpected way. There’s a simple fix to this, all you have to do is reset the problematic service.
- Press the Windows + R keys on your keyboard to launch the Run utility. Type in “services.msc” and hit the OK button.

- Locate the WLAN AutoConfig entry in the Services window, then right-click on it and choose Properties.
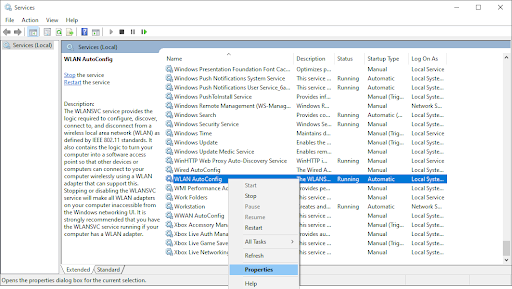
- Change the Startup type to Automatic. When selected, click on the Apply button, then close the window by pressing the OK button.
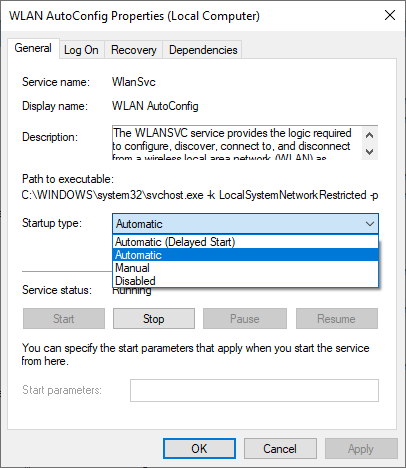
- Click on the Apply button, then close the window by pressing the OK button.
- Test if you still have WiFi connection issues. If yes, restart your computer and try again.
Method 6: Update your wireless drivers
Outdated drivers can cause a whole bunch of issues on your system. Make sure to update them in order to possibly fix any issues with your mouse on Windows 10.
- Press the Windows + X keys on your keyboard and click on the Device Manager option from the menu.
- Expand the Network adapters menu by clicking on the arrow next to it.

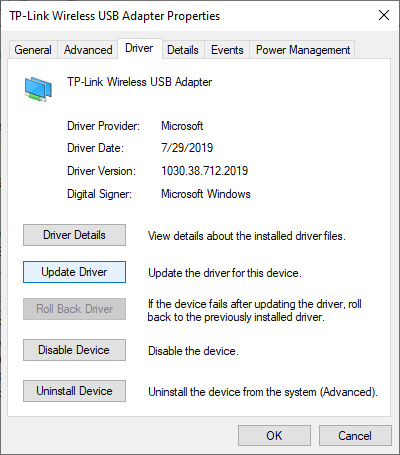
- Double click on your adapter. In the new window, switch to the Driver tab, and then click on the Update Driver button.
- Allow Windows 10 to look for the newest driver on your local computer or online, then follow any on-screen instructions to install it on your device.
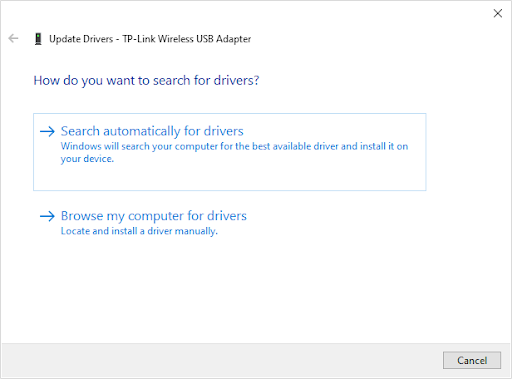
- It's possible that Windows 10 doesn't detect any driver updates. It's good practice to check the manufacturer's website for any possible updates. If you find an updated driver, install it manually on your device.
- Restart your computer and test if the WiFi disconnecting error is still present.
We hope our guide was able to help you resolve the issue of your WiFi frequently disconnecting. Enjoy browsing the internet like it was meant to be!
Final thoughts
If you notice in the future that your system is experiencing similar issues, feel free to return to our article and apply some other fixes. If nothing works, we recommend turning to either Microsoft’s customer support team or looking for an IT specialist in regards to your PC’s health.


Comments
Post a Comment